
How I ported my blog to HTTPS
In the last couple of years several elements are pushing for a widespread adoption of the HTTPS protocol.
-
Security. Of course security, what else would you expect from HTTPS. HTTPS is all about security! It guarantees that the server you’re connecting is really the one you believe it is, and that the contents of the communications is private, so that it can’t be read, or modified by a anyone else.
-
Performance. HTTPS requires an extra round trip in respect of HTTP. The resulting extra latency time, until now, has penalized HTTPS connections in terms of performance. However the fact that the most important browser vendors have decided to support HTTP2 (a new, faster version of HTTP) only over TSL has the potential to turn the performance factor in favor of HTTPS.
-
Costs. I don’t know of any hosting company that won’t charge you at least 50€/year for an SSL certificate; in my opinion this is the single most important factor that until now has slowed down the adoption of HTTPS through small website like this one. However today using a service like letsencrypt, everyone could generate a valid certificate with no additional costs.
-
Richer experience. Again, most browser vendors are blocking some HTML5 API over not secure connections. If your application, or website needs to access the browser native Geolocation API, it has to be on a secure domain; similarly for Service Worker… and probably more I still don’t know about.
-
SEO. Google doesn’t share too much about its indexing criteria, so the few reliable information should be adequately considered… and it’s not new that Google sees HTTPS as a ranking signal.
All these factors make me start considering the possibility to adopt HTTPS, and as you could well imagine from the title of this post, at the end I ported my blog on HTTPS.
In this post I would like to share this experience.
Finding a host
Until today my blog was hosted by GoDaddy.
GoDaddy offers domain registration for 9€, and the hosting plan (which also includes
25 database - which I don’t really need since have a static site) starts from 8€/month.
Of course SSL is an extra, and it costs 90€/year. Doing the math is up to you.
I didn’t want to spend all this money.
As many of you, I’ve also other websites with different hosting companies; and DigitalOcean is by far the best I’ve ever dealt with. They have really a great documentation, and their support is fast, and efficient (I talk for personal experience).
DigitalOcean hosting plan starts from 5€/month, and include admin access to a server in the cloud (or droplet, as they call it).
However moving my blog over DigitalOcean was not an easy choice. As everyone knows with great power comes great responsibility… and being administrator of my web server is definitely a lot of power.
I didn’t choose DigitalOcean to save a few money; being admin of a server in the cloud will be the occasion to learn something more, in a field I am still not so good.
In case you want to give DigitalOcean a try, just be sure to register through this link, so you can get 10$ for free.
About my droplet
Let me provide some information about the droplet that hosts this website.
It’s a server with 512MB of memory, and 20GB of disk space; it’s not that much, but it is enough for now, and being in the cloud give me further flexibility to make it grow, or shrink on necessity.
The installed OS is Ubuntu 16.04, and the web server is Apache.
Interaction happens through DigitalOcean control panel, or most of the time, via SSH.
Migration plan
Once I found my ideal hosting solution, I defined the migration plan; despite the name it was a pretty straightforward operation, that involved to transfer via SFTP my website on my new droplet, and then switching the DNS.
I decided to enable HTTPS in a second phase, in order to verify that everything was still ok, even on the new host.
Deploy
The first thing I did was to upload via SFTP the content of my website. I did this manually,
using my loyal Filezilla client. In the future I would like to make this process
run automatically (just after the jekyll build command), and since I already use grunt
as task runner, use the grunt-sftp-deploy
task seems the way to go.
Before switching the DNS, I checked everything was fine, via browser, pointing directly to my droplet IP address, and then navigating through the directory tree.
Once I verified that upload succeeded, I proceeded configuring a new virtual host on Apache.
<VirtualHost *:80>
  ServerAdmin admin@brunoscopelliti.com
  ServerName brunoscopelliti.com
  ServerAlias www.brunoscopelliti.com
  DocumentRoot /path/to/website/folder
  ErrorLog ${APACHE_LOG_DIR}/error.log
  CustomLog ${APACHE_LOG_DIR}/access.log combined
</VirtualHost>
If you have one or more domains on the third level, you should configure them as well. I suggest you to put the configuration in a separate file; this not only helps keeping clean the config file, but I found it is necessary to make letsencrypt work properly.
Switch DNS
DigitalOcean (not surprisingly) provides documentation about how to switch DNS in their favor. In this case following the steps of How to setup a host name with DigitalOcean made the trick.
Enable HTTPS
Using letsencrypt is pretty easy. I didn’t have much more to do than cloning it from Github, and then launching the certificate generation command. However even in this case DigitalOcean has a tutorial to guide you through the process, Secure Apache via letsencrypt.
So briefly these are the steps which I followed.
- Clone letsencrypt client.
sudo git clone https://github.com/letsencrypt/letsencrypt /opt/letsencrypt
- Run the
letsencrypt-autocommand
cd /opt/letsencrypt
./letsencrypt-auto --apache -d brunoscopelliti.com -d slides.brunoscopelliti.com
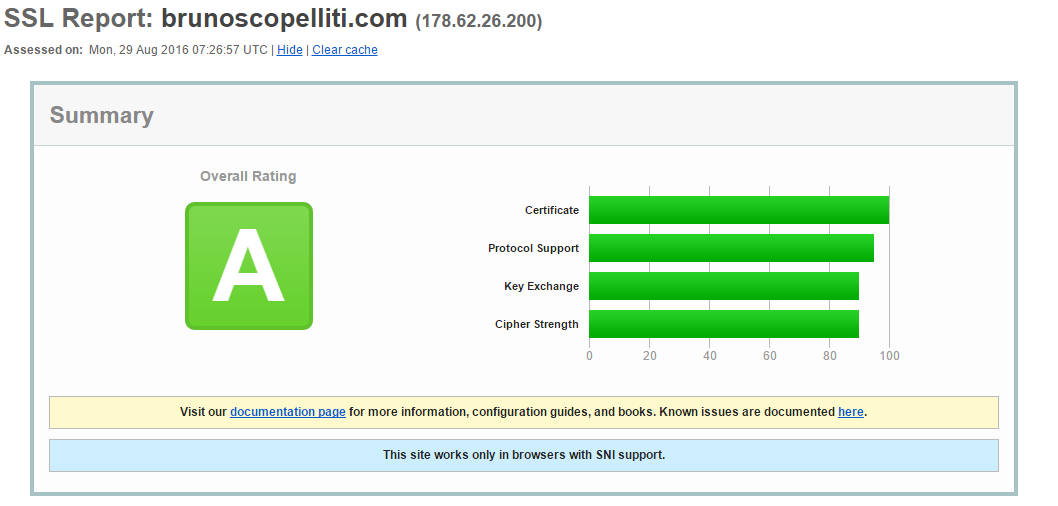
- Complete following the wizard instructions, and eventually verify the validity of the certificate here. That’s the result for my blog:
As an extra step, you may want to register a cron job to automatically renew the certificate
sudo crontab -e
And then in the cron job editor, something like:
0 1 * * 1 /opt/letsencrypt/letsencrypt-auto renew >> /var/log/le-renew.log
which every Monday, at 1.00AM, run the letsencrypt-auto renew, and then save
its output in the specified file.
Next steps
I would like to improve further the experience of the readers of my blog; I think it’s my card visit as web developer.
Now that my website is served on a secured domain, I would try to enable HTTP2, and adopt a CDN for the static resources (CloudFare is the only one I know about which starts with a free plan).